RGB Tutorial: how to match your Printer Fonts to Stampin' Up colours

In my previous post I showed you the Father's Day card we made at my Open Home today (in New Zealand we celebrate Father's Day on the first Sunday in September, so its coming up soon). I created the custom "Father's Day" phrase using my computer and printer. I used RGB values to match to my Pacific Point star image from the Starring You set (retiring).
Here's a quick tutorial showing you how I did it. This is my first online tutorial so I would appreciate any feedback. Please email me if you have any questions.
I am using Microsoft Word Office 2007, but this will be similar in other versions of Word. (If you are using a Mac, congrats, I hope to make the change soon. But in the meantime I can't help you!)
In Microsoft Word, draw a text box and format it to the size you want. I planned to use my word window punch to punch out the phrase once it was printed, so I made my text box 1 x 5 cm.

Then choose your font and type your phrase in the text box. I used Harrington. Adjust your font size until the whole phrase fits within the text box. I used Font size 18 in bold. Format so the phrase is centred in the text box.
To set the colour, highlight the text, right mouse click and choose Font from the drop-down menu. (there are other effects here you may want to play around with later)

Click on "font colour", then choose "more colours". Then click on Custom tab
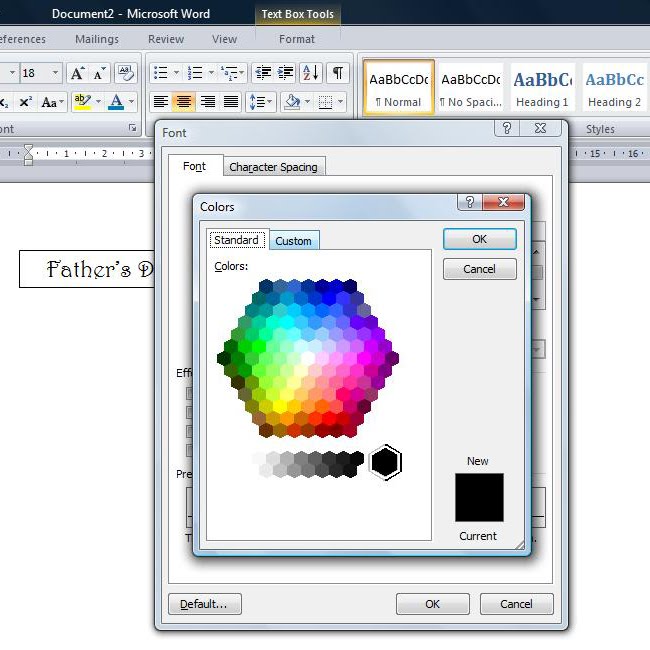
Now type in the RGB values in the appropriate space. For Pacific Point the RGB is 0/126/179. This will automatically convert your text to the correct colour.

To print out, first I print out onto a sheet of ordinary printer paper. (You can load a whole A4 sheet of cardstock in your printer, but this is how I do it when I am printing a one-off phrase)

Then.... this is the important part... remember to format your text box in the Colour and Lines tab to "No Colour" before you print your final copy.
Otherwise you will have a black line around your text. I don't do it until the second print stage because the box helps me line up my scrap cardstock in the right place on the printer paper.
Use a piece of cardstock a little larger than your text box and adhere the top edge to the printer paper so it covers the text box. This is a great time to use the removeable dotto adhesive.


Put the printer paper with attached cardstock back in the printer paper tray and re-print. (you need to know which way your printer loads so you can put the paper back in the correct way up) Remove the cardstock from the paper, punch out with word window.

Use on your project.

I found a great list of RGB values on Marni Levett's website for all the colours in the brand-new Ideas Book and Catalogue. This catalogue and all the goodies will be available from 1 September. Contact me to pre-order the catalogue, or get one free when you place an order over $100 by 31 August.


Comments